This post contains affiliate links. We may earn compensation when you click on the links at no additional cost to you.
I have thought about trying the “German Schmear” on our brick fireplace ever since seeing the technique on Fixer Upper. So one spring quarantine weekend, I decided to do grab the essentials and finally just DO IT!
And I’m so glad we did!


brick fireplace before and after photos!
We thought about replacing the faux brick face of our floor-to-ceiling fireplace with a modern, layered-stone style, but we also knew that there were already way too many things higher on the priority list for 2020.
But I couldn’t spend another season looking at this dark, dreary fireplace…

So it was time to just make it happen. I was a little worried I might do all this work and end up hating it. I have only found a select few German shmear photos that I’ve see online. But the ones I do like, I love!
I had the reassurance that if I screwed this up, at least we would only have to look at it for another year or so before it could be fully replaced. And, it would really just help push this project higher up that priority list, so nothing to lose! Luckily, the low risk was worth the big rewards in the end.
Here’s what we used to use to German Schmear the brick:

- Dap Presto Patch Compound
- Sponge
- Putty knife
- Storage bags
- Not Pictured But Used: Disposable gloves
And this is how simple it is to apply the German Schmear:
We placed some Presto Patch compound into the sandwich bags and cut a hole to use to pipe the compound into the grout and then followed up with the putty knife to smooth and overlap onto the bricks.
However, we actually ended up using the putty knife and the sandwich bags way less than expected. We actually had better success with just pressing the compound into the grout by hand. So, that is why we are adding disposable gloves to the list above!
I think that for more shallow grout, the putty knife technique would have worked a lot better. But this grout was quite deep, so it was easier to just press the compound into the space and smear onto the brick.
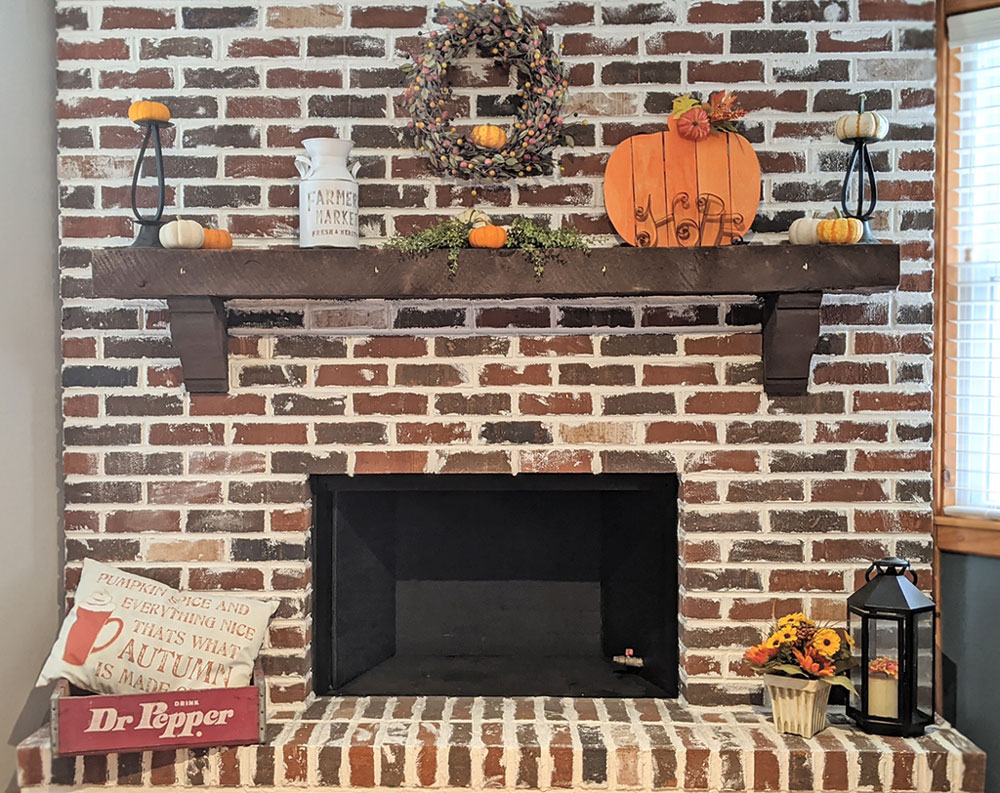
We used the wet sponge a few times to scrub a few bricks that got a little more of the compound on them than we wanted. I do love how that spot turned out, though. In the photo below, it’s above the Dr Pepper decor.
In fact, I’m already considering adding more compound to the rest of the fireplace to match that area.
The goal was to achieve a subtle schmear with just enough overlap to soften all the straight edges and sharp corners of the bricks and give the fireplace a lighter, softer look while still revealing the brick color.

the space and has added some ‘old-world charm’ to our dining room!
A big “thank you!” to my daughter, Ella, for being so enthusiastic about this project and willing to jump right in and help me out! With her help, it only took the two of us about 6 hours to do the entire fireplace.
We love the results! The German Schmear brick fireplace has brightened up the space and has added some ‘old-world charm’ to our dining room!
Check out some of our other home projects here!


Great job!
I love it! Great home project.
What a big difference that makes! Amazing!
Wow that is awesome…what a difference.
Way to freshen in up and update at the same time!
What a fun project to take up. Certainly looks brighter & better!
This looks amazing! I had no idea it was that easy to do, and it definitely looks better than before. And I love the slider image to compare the before and after.
Love this technique and look forward to doing mine this winter!
Great project and results! I wish we had a fireplace!!!
Looks great! Always nice when you can get such a huge bang for your buck!
Looks great! Much brighter and more up to date.
I’ve white washed by orange brick fireplaces. It’s amazing how much it brightens the room. This looks really good!
We recently changed our fireplace too and it makes the room look so much better!
It came out great! Definitely brightened up the room.
That looks great! It really lightened up your fireplace!!
Those silly Germans! (I am one). Love the look and didn’t know it was so easy!
Love this! It came out amazing. I saw an episode from Joana gains and they did the German Schmear technique, definitely a great facelift for any dark or dingy brick!
I absolutely love the result! Beautiful job.
It looks great! I’ve been trying to decide if we should go with this route or paint ours white. This is very helpful. Thanks!
Now I wish I had a fireplace!
You and your daughter Ella did a great job! 👍🏼 I think it turned out great and up until now I didn’t know what German Schmear looked like. It really is nice and makes the fireplace stand out. Thank you for sharing 😊
This looks so good! Great job!
So beautiful and so nostalgic! This looks like my fireplace as a kid!
I remember seeing this episode and it was wild to see the transition. It looks great for your fireplace. Kudos for doing this yourself! I guess that makes you a Fixer Upper! Thanks for sharing.
Looks great. Your family did a nice job with this project!
I’ve never heard of this but I LOVE it!
Love this look. Thanks for sharing!